
WEBCAM LIVE ULTRA FOR NOTEBOOKS - Webcam CREATIVE - Free user manual and instructions
Find the device manual for free WEBCAM LIVE ULTRA FOR NOTEBOOKS CREATIVE in PDF.

User questions about WEBCAM LIVE ULTRA FOR NOTEBOOKS CREATIVE
0 question about this device. Answer the ones you know or ask your own.
Ask a new question about this device
Download the instructions for your Webcam in PDF format for free! Find your manual WEBCAM LIVE ULTRA FOR NOTEBOOKS - CREATIVE and take your electronic device back in hand. On this page are published all the documents necessary for the use of your device. WEBCAM LIVE ULTRA FOR NOTEBOOKS by CREATIVE.
USER MANUAL WEBCAM LIVE ULTRA FOR NOTEBOOKS CREATIVE
| Focus ring | Adjusts the view focus. Point the lens toward your subject and then rotate this ring in a clockwise or counterclockwise motion until the image is in focus. |
| Power LED | Lights up when your webcam is connected to your notebook's USB port. |
| USB cable | Connect it to your notebook's USB port. |
| Clip | Use this to mount your webcam on your notebook's screen. |
Getting Started
1 Installing Your Webcam
You need to install device drivers and applications before using your webcam.
Do not connect your webcam to your computer before installing the drivers.
If you accidentally begin installation with your webcam connected and the Add New Hardware Wizard or Found New Hardware Wizard dialog box appears, click the Cancel button.
I. Insert the Installation CD into your CD-ROM drive. Your CD should start automatically. If it does not, follow the steps below:
i. Start Windows Explorer.
ii. On the left pane, click the My Computer icon.
iii. Right-click the CD-ROM/DVD-ROM drive icon, and then click Autoplay.
- Select the region you are in and then click the Next button.
- Select a language and then click the Next button.
- Click the options for installing drivers and applications, and then click the Install button.
- When prompted, connect your webcam's USB cable to an available USB port on your computer (see "Connecting Your WebCam" on page 7). Windows automatically detects the device.
- To complete the installation, follow the appropriate steps below:
For Microsoft® Windows® XP
i. When the Found New Hardware Wizard dialog box appears, select Install the software automatically (Recommended), and then click the Next button.
ii. Follow the instructions on screen to complete the installation. You may be asked, after the drivers have been successfully installed, if you want to restart your computer. Select No until all the applications are installed.
iii. Restart your computer after all the applications have been installed.
To verify the installation, see "Verifying the Installation" on page 8.
For Windows 2000
i. When a Digital Signature Not Found dialog box appears, telling you that Creative WebCam Notebook Ultra has been detected, click the Yes button.
ii. Follow the instructions on the screen to complete the installation. You may be asked, after the drivers have been successfully installed, if you want to restart your computer. Select No until all the applications are installed.
iii. Restart your computer after all the applications have been installed.
To verify the installation, see "Verifying the Installation" on page 8.
For Windows Me and Windows 98 SE
i. If you are prompted to insert the Windows 98 SE or Windows Me CD, replace the Creative WebCam Notebook Ultra Installation CD with the appropriate CD.
ii. In the Insert Disk dialog box, click the OK button.
iii. Follow the instructions on the screen.
iv. Click the Finish button. You may be asked, after the drivers have been successfully installed, if you want to restart your computer. Select No until all the applications are installed.
v. Restart your computer after all the applications have been installed.
To verify the installation, see "Verifying the Installation" on page 8.


For users with USB 2.0-equipped computers only
Creative Installation automatically checks that the software components required for optimal USB 2.0 performance are installed on your computer, and alerts you if these components are missing. If you receive such a message, do one of the following to ensure that your webcam always performs to its fullest potential over a USB 2.0 connection:
- install the USB 2.0 driver provided by your hardware vendor
- download and install the latest Windows Service Pack for your operating system. You can obtain this from the Microsoft Help and Support website or via Windows Update.

2 Connecting Your WebCam
- Do not connect your webcam to your computer before installing the drivers. To install your drivers, see "Installing Your Webcam" on page 4.
- After installing the drivers, connect your webcam as shown. Clip your webcam on top of your notebook screen.
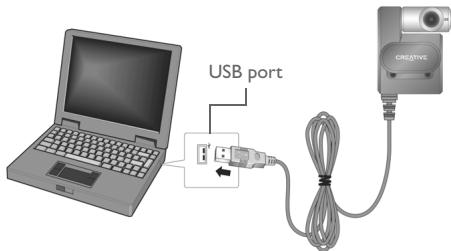
Figure 2
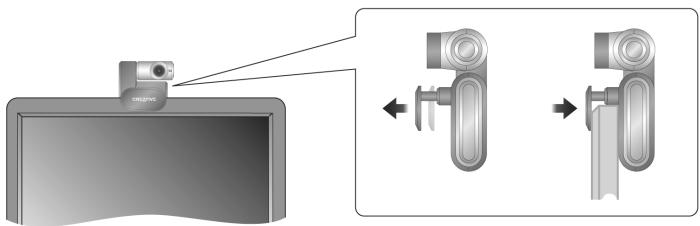
Figure 3

- You can connect your webcam while your computer is turned on.
- You can attach your webcam to a USB hub or device with its own dedicated power supply.
- Connect your headset to your computer's microphone and headphone connectors. Refer to your computer or audio card documentation for the microphone and headphone connectors.
3 Verifying the Installation
I. Right-click the My Computer icon on your desktop or in the Windows Start menu.
2. On the menu that appears, click Properties.
In Windows XP and Windows 2000 only:
In the System Properties dialog box, click the Hardware tab. Click the Device Manager button.
In Windows Me and Windows 98 SE:
In the System Properties dialog box, click the Device Manager tab.
3. Click the plus (+) sign next to the Imaging Device icon. The entry "Creative WebCam Notebook Ultra" appears.
4 Using Your Creative WebCam
Taking a Photo
I. Click Start Programs Creative Creative WebCam Creative WebCam Center.
2. In the Creative WebCam Center window, click the Capture tab.
3. Click the Photo Resolution box and select the resolution that you want.
4. Click the Snap photo button to capture an image. Images are saved as files in the default media folder.
To view the photos in the image viewer, double-click the image files in the Thumbs/ Details pane.
Recording a Video
- Click Start Programs Creative Creative WebCam Creative WebCam Center.
- In the Creative WebCam Center window, click the Capture tab.
- Click the Video Resolution box and select the resolution that you want.
- Click the Record button to start and stop video recording. Videos are saved as files in the default media folder when you stop recording.
To view the videos in the video viewer, double-click the video files in the Thumbs/ Details pane.

Enabling Face Tracking
With Face Tracking, your camera automatically zooms in on your face during video instant messaging sessions, or when recording video.
You can enable Face Tracking in the Face Tracking Utility. You can launch the Face Tracking Utility in the following ways:
- In WebCam Center, click Tools Face Tracking Utility.
- Right-click the Creative Cam Detector icon in the System Tray and click the Face Tracking Utility option.
- Click Start Programs or All Programs Creative Creative WebCam Center Face Tracking Utility.
For more information, read the User's Guide on the Installation CD.
Go to d:\manual\language>manual.chm (replace d:\ with the drive letter of your CD-ROM/
DVD-ROM drive, and

More Information
Creative Knowledge Base
Resolve and troubleshoot technical queries at Creative's 24-hour self-help Knowledge Base. Go to www.creative.com and select your region.
Register your product!
Enjoy a host of benefits by registering your product during installation, or at www.creative.com/register. Benefits include:
Service and product support from Creative
Exclusive updates on promotions and events.
Please note that your warranty rights are not dependent on product registration.
Customer Support Services and Warranty
You can find Customer Support Services, Warranty and other information in the Installation CD.
| Customer Support Services | d:\support\region\language\support.chm |
| Warranty | d:\warranty\region\language\warranty.chmPlease keep your Proof of Purchase for the duration of the warranty period. |
| User's Guide | d:\manual\language\manual.chm |
(replace d:\ with the drive letter of your CD-ROM/DVD-ROM drive,
Copyright © 2005 Creative Technology Ltd. All rights reserved. The Creative logo is a registered trademark of Creative Technology Ltd. in the United States and/or other countries. Microsoft and Windows are registered trademarks of Microsoft Corporation. All other products are trademarks or registered trademarks of their respective owners and are hereby recognized as such. All specifications are subject to change without prior notice. Actual contents may differ slightly from those pictured.
François
Creative Knowledge Base
Creative Knowledge Base
Creative Knowledge Base
Creative Knowledge Base
Creatives Knowledge Base
Creatives Knowledge Base
Creative Knowledge Base